
In This Article
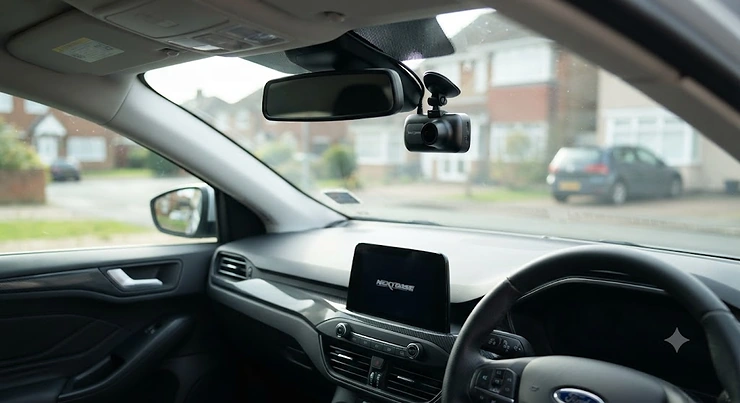
Loose wires dangling off your rear-view mirror like a Christmas decoration that never came down. That’s the giveaway of a dash cam still living off the cigarette lighter socket, and it’s the first thing that has to go if you actually want the thing to work while your car is parked. Learning how to hardwire a dash cam is really just learning how to give a small camera a permanent, tidy, self-regulating power source instead of a socket you unplug every time you fancy charging your phone. Done properly, hardwiring means your camera wakes up the instant you touch the door handle and keeps a quiet eye on things long after the engine’s gone cold.
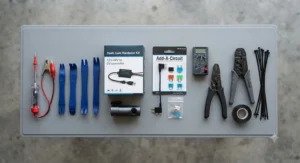
What is hardwiring a dash cam? In short: it’s connecting the camera directly to your car’s fuse box, using a small cable and a fuse tap, so it gets constant power for parking mode instead of only working while the ignition is on. It sounds fiddly. It isn’t, once you know which two wires you’re actually looking for.
This guide walks through seven genuinely available hardwire kits, from budget mini-USB cables to proper voltage-cutoff modules, plus the wiring theory, the common ways people get it wrong, and what UK law actually says about cameras stuck to your windscreen. According to the RAC’s guide to dash cam installation, dash cams are entirely legal across the UK, which is one less thing to worry about before you start pulling trim off your A-pillar. Whether you’re chasing permanent parking mode protection or just tired of a cable trailing across your dashboard, there’s a route through this that suits your car, your budget, and your patience for fiddly connectors.
What Is Hardwiring a Dash Cam?
Hardwiring a dash cam means wiring the camera straight into your vehicle’s fuse box rather than relying on the cigarette lighter or a USB socket. A small cable taps two fuse slots — one live only with the ignition on, one permanently live — plus an earth point, giving the camera continuous power for parking mode while protecting the car battery from being drained flat.
That permanent-live wire is the whole point. Without it, your camera is basically asleep the second you turn the key, which defeats about half the reason people buy one in the first place — catching the supermarket trolley that dinged your door, or the hit-and-run that happened while you were in the shop. Reviewers on installation forums and retailer Q&As consistently frame the trade-off the same way: a hardwire kit costs a bit more effort up front, but it turns a driving camera into a 24-hour witness.
Quick Comparison Table
| Kit | Connector | Voltage Protection | Price Range | Best For |
|---|---|---|---|---|
| Nextbase Series 2 Hardwire Kit | Mini USB | Fixed low-voltage cutoff | Under £25 | Nextbase owners wanting plug-and-play |
| VIOFO HK3-C | USB-C | 4-level adjustable cutoff | £20–£30 range | Viofo A139/A139 Pro owners |
| BlackVue Power Magic Pro | Cigarette-socket style | Adjustable voltage + timer | £35–£45 range | Anyone wanting the most configurable protection |
| Plozoe Mini USB Kit | Mini USB | Basic fixed cutoff (11.6V) | Under £15 | Budget-conscious first-timers |
Looking at the spread above, the Nextbase Series 2 Hardwire Kit wins on sheer convenience if you already own a compatible Nextbase camera, since it’s designed as a drop-in match rather than a universal bodge. The BlackVue Power Magic Pro sits at the top of the price range for good reason — its dip-switch voltage and timer controls give you far more say over exactly how long parking mode runs before it shuts itself down. Budget buyers shouldn’t dismiss the Plozoe Mini USB Kit out of hand, either; it does the core job of powering a camera safely, just without the fine-tuning the pricier options offer.
💬 Found the right kit for your car yet? Bookmark this page — you’ll want the wiring steps below before you touch a single fuse.
Top 7 Dash Cam Hardwire Kits: Expert Analysis
1. Nextbase Series 2 Hardwire Kit — best plug-and-play for Nextbase owners
Nextbase built this kit specifically to piggyback off any UK fuse box without demanding any wire-stripping at all. The 5-metre cable is genuinely long enough to run from the fuse box behind the dash all the way up to the windscreen mount, and it ships with both standard ATO/C and mini ATM fuse taps, so Nextbase’s own product documentation notes it covers most vehicles without you needing to guess your fuse type in advance. A blue LED confirms the camera’s getting power, which sounds trivial until you’re upside down under a steering column at 11pm wondering if you’ve wired it right. It’s built exclusively for Nextbase’s Series 2 range (122 through to 622GW), so this isn’t a universal fix if your camera is a different brand — that compatibility limit is the trade-off for how neatly it’s designed to match Nextbase’s own connector and voltage requirements. Buyers who’ve fitted it describe the process as genuinely doable in an afternoon, with the main hurdle being locating the correct fuse rather than the wiring itself. What most buyers overlook is that the built-in voltage limiter only protects the battery if the kit is wired to a genuinely permanent live feed, so getting the fuse selection right matters more than the kit itself.
Pros:
- ✅ Fits all Series 2 Nextbase cameras without extra adapters
- ✅ 5-metre cable reaches almost any fuse box location
- ✅ Blue LED confirms live power at a glance
Cons:
- ❌ Locked to Nextbase Series 2 cameras only
- ❌ Not compatible with the Piqo model
Prices sit in the high-teens to low-£20s range at the time of research, and it’s solid value if you already own a compatible Nextbase — buying a universal kit instead would save little and cost you the tidy LED indicator and exact-fit connector.
2. VIOFO HK3-C — best USB-C kit for the Viofo A139 range
This is the hardwire cable built specifically for Viofo’s A139 and A139 Pro cameras, using the newer USB-C connector rather than the ageing mini-USB standard many older kits still ship with. What most buyers overlook when shopping by connector type alone is that the HK3-C’s real selling point is its four-stage low-voltage cutoff, letting you choose how conservative the battery protection should be depending on how often you drive the car. Reviewers on Amazon’s UK listing repeatedly flag one specific pitfall: it’s easy to confuse this with the older mini-USB HK3, since the naming is nearly identical, and ordering the wrong one means a return and a delay before parking mode works at all. On the plus side, buyers who used a professional installer describe the cable as comfortably long enough to route from the front to the back of a family estate car, which says something about how generously VIOFO specced the loom length.
Pros:
- ✅ Four adjustable low-voltage cutoff points
- ✅ USB-C connector suits newer Viofo cameras
- ✅ Cable length comfortably spans large vehicles
Cons:
- ❌ Fuse taps sold separately, not included
- ❌ Easy to order the wrong variant by mistake
Expect to pay somewhere in the £20–£30 range, plus a small extra outlay for fuse taps if your kit doesn’t bundle them — worth checking the listing carefully before you order.
3. VIOFO HK4 — best for the latest Viofo A229 and A329 series
Where the HK3-C serves older Viofo models, the HK4 is the current-generation hardwire cable for the A229 Plus, A229 Pro, A229 Ultra and A329 series, again on USB-C. According to VIOFO’s own hardware documentation, the HK4 adds cutoff-time protection on top of voltage monitoring, meaning it can disconnect the camera after a fixed number of hours regardless of what the battery voltage is doing — a second layer of protection that matters if you regularly leave the car for a long weekend. Reviewers highlight the automatic voltage display as a genuinely useful touch, since it lets you glance at the unit and confirm the car’s electrical system is behaving normally rather than trusting a cutoff you can’t see happening. The main criticism circulating is compatibility confusion — VIOFO now runs five different hardwire kit numbers (HK3 through HK6) across its range, and matching the right one to your specific camera model takes a bit of label-reading before you order.
Pros:
- ✅ Combines voltage and timer-based cutoff protection
- ✅ Voltage display shows battery health at a glance
- ✅ Covers VIOFO’s newest flagship camera range
Cons:
- ❌ Five similarly-named kit variants cause ordering mistakes
- ❌ Fuse taps often need buying as a separate accessory
Pricing typically lands in the £20–£30 bracket, similar to the HK3-C, making the choice between them purely about which camera generation you own rather than which is better value.
4. BlackVue Power Magic Pro — best for advanced, fully adjustable protection
This is the one hardwire solution here that isn’t really a cable at all — it’s a dedicated control box with dip switches, sitting between your fuse box and the camera. Based on the spec comparison with the simpler cable-only kits above, the Power Magic Pro’s key advantage is genuine configurability: you set the exact voltage cutoff and the exact time limit independently, rather than accepting a single fixed threshold. It also plugs into a standard cigarette-lighter-style socket on the camera end, which according to retailer technical documentation makes it compatible with non-BlackVue cameras too, provided they normally run from a 12V socket. Aggregated review sentiment on Amazon UK is genuinely mixed — plenty of buyers report years of trouble-free service, but a noticeable minority describe the unit failing to power the camera reliably after a few months, so this is one where checking recent reviews before ordering is worth the extra five minutes. One recurring complaint worth flagging honestly: several buyers of premium BlackVue cameras felt a £400-plus dash cam should include this kit rather than charge separately for what they consider an essential accessory.
Pros:
- ✅ Independently adjustable voltage and timer cutoffs
- ✅ Works with most 12V-socket cameras, not just BlackVue
- ✅ Widely regarded as the most configurable option here
Cons:
- ❌ A vocal minority report reliability issues over time
- ❌ Noticeably pricier than simple cable-only kits
At around £35–£45, it’s the most expensive option on this list, and the honest verdict is that it earns that premium only if you actually want to fine-tune the settings — casual users may find a simpler kit does the job for less.
5.Plozoe Mini USB Hardwire Kit — best budget universal option
This is the sort of kit that turns up in Amazon’s bestseller lists precisely because it’s cheap, works with almost anything running mini-USB, and comes with a genuinely generous bundle — four fuse taps, an installation pry tool, and a mini-to-USB-C adapter cable for cameras that have since switched connector standards. The 24-hour surveillance claim on the listing is really just describing the standard hardwire behaviour every kit here offers, but the fixed 11.6V cutoff (or 23.5V on 24V systems) means there’s no adjustment if your car’s electrical quirks need a more conservative threshold. Reviewers repeatedly describe installation as beginner-friendly, largely thanks to the included pry tool for popping off interior trim without scratching it — a small inclusion that pricier kits sometimes skip entirely. What the spec sheet won’t tell you is that “wide compatibility” here really means anything with a mini-USB or (via the bundled adapter) USB-C dash cam, GPS unit, or radar detector, making it a genuinely flexible pick if you’re equipping more than one gadget.
Pros:
- ✅ Includes four fuse taps and a trim-removal tool
- ✅ Mini-to-USB-C adapter widens camera compatibility
- ✅ Genuinely beginner-friendly installation process
Cons:
- ❌ Fixed voltage cutoff, no adjustment available
- ❌ Basic build quality compared to branded kits
At under £15, it’s the cheapest kit on this list and a sensible starting point if you’re hardwiring for the first time and don’t want to commit serious money before you know you’ll get on with the process.
6. Vantrue Type-C Hardwire Kit — best for dual-channel front-and-rear systems
If you’re running a front-and-rear or interior-and-exterior dash cam setup, powering two cameras from separate sockets gets messy fast, and this is where Vantrue’s dual-output kit earns its keep. Built with 16-gauge cable and a voltage regulator rated for the higher combined current draw of two cameras, it’s specifically designed for multi-camera systems rather than being stretched beyond its comfort zone. Reviewers who run dual-channel setups describe the dual USB outputs as removing the need for a separate splitter or second hardwire cable entirely — a genuine convenience win over buying two single-output kits. The trade-off is size: a dual-port unit is inevitably bulkier than a single-purpose cable, so if you only run one camera, this is arguably overkill and a simpler single kit will serve you better and tidier.
Pros:
- ✅ Powers two cameras from a single fuse-box connection
- ✅ Thicker 16 AWG cable suited to higher current draw
- ✅ Five-metre cable length covers most vehicles
Cons:
- ❌ Bulkier than necessary for single-camera setups
- ❌ Limited to Vantrue’s own compatible camera range
Typically priced in the £15–£25 range, it undercuts buying two separate single-port kits while doing a genuinely better job of managing shared power delivery.
7. Add-a-Circuit Mini Blade Fuse Tap 10-Pack — best standalone fuse tap accessory
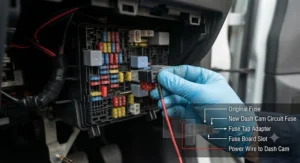
Not every hardwire cable comes with the right fuse tap in the box, and that’s exactly the gap this kind of bundle fills — a set of mini blade fuse taps sold on their own, independent of any specific camera brand. As dash cam manufacturers’ own installation guides commonly explain, fuse taps rated between roughly 1 and 2 amps are what most dash cam hardwire modules actually need, and having a mixed pack on hand means you’re not stuck mid-install because your particular car uses a mini or micro fuse slot rather than the standard size a kit assumed. These “add-a-circuit” taps work by piggybacking a spare fuse slot: you move your car’s existing fuse into the tap’s spare socket, then plug the tap (with its own small fuse) into the now-empty original slot, leaving the original circuit completely untouched. Reviewers who’ve used generic fuse tap multi-packs describe them as cheap insurance against buying the wrong single type and having to make a second trip to the shop. The obvious limitation is that a fuse tap alone does nothing — it needs pairing with an actual hardwire cable or module from the list above to actually power a camera.
Pros:
- ✅ Covers multiple common blade fuse sizes in one pack
- ✅ Non-invasive — original circuit stays completely intact
- ✅ Cheap backup for any hardwire kit’s fuse taps
Cons:
- ❌ Does nothing without a separate hardwire cable
- ❌ Cheaper packs can have looser-fitting prongs
At well under £10, it’s the smallest outlay on this entire list, but arguably the accessory most worth having spare, since a loose or wrong-size fuse tap is one of the most common reasons a hardwire install stalls halfway through.
Practical Installation Guide: Wiring a Dash Cam Direct to the Fuse Box
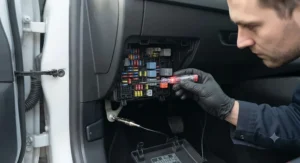
Right, tools down for a second — here’s what actually happens once you’re under the dash. Start by locating your fuse box (usually under the steering column or in the glovebox on most UK cars) and its diagram, printed either in the handbook or on the inside of the fuse box cover itself. You’re hunting for two things: a fuse that’s only live when the ignition is on (labelled ACC, IGN, or similar) and one that’s permanently live regardless of engine state (often labelled BATT or marked as a constant feed). Test both with a circuit tester or multimeter before committing — guessing wrong here is the single most common reason parking mode fails to trigger at all.
Once you’ve confirmed the right pair, remove each fuse, slot it into the spare socket on your fuse tap, then push the tap itself into the vehicle’s now-empty original slot. Route the hardwire cable behind trim panels using the pry tool most kits include, working from the fuse box up towards the windscreen mount, and clip the earth wire to a bare metal bolt point rather than painted bodywork, since paint acts as an insulator and will give you an unreliable ground. Common first-30-day mistakes include forcing cable behind trim too aggressively (cracking clips that then rattle for months afterwards) and skipping the voltage-tester step entirely, wiring blind and hoping for the best. Give the whole system a week of normal driving before trusting parking mode fully — that’s long enough to confirm the low-voltage cutoff is behaving as expected rather than draining the battery on the first cold morning.
Real-World Scenarios: Matching the Right Hardwire Kit to Your Car
Picture a university student commuting eight miles into campus in a ten-year-old hatchback, parking on residential streets most evenings. Budget matters more than fine-tuned voltage settings here, so the Plozoe Mini USB Hardwire Kit or the standalone Add-a-Circuit Mini Blade Fuse Tap 10-Pack paired with any basic hardwire cable covers the job without overspending on features that would go unused.
Now picture a family running a newer SUV with a front-and-rear camera setup, parked on a driveway overnight but occasionally left for a fortnight during holidays. The Vantrue Type-C Hardwire Kit handles the dual-camera power draw cleanly, and pairing it with a conservative voltage cutoff setting matters more here, since a fortnight of dormancy is exactly the scenario a poorly configured hardwire kit can turn into a flat battery.
Finally, imagine someone who’s already invested in a premium multi-channel BlackVue setup and parks in a high-footfall city car park daily. The BlackVue Power Magic Pro‘s adjustable timer and voltage settings genuinely earn their higher price here, letting the owner dial in exactly how long parking mode runs based on how frequently the car actually moves.
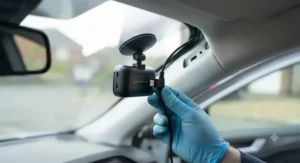
How to Choose a Dash Cam Hardwire Kit
- Check your camera’s connector type first. Mini-USB and USB-C kits aren’t interchangeable, so match the cable to your specific model before anything else.
- Identify your fuse box’s fuse size. Mini, Micro2, and standard ATO fuses all need different tap adapters, and getting this wrong means a wasted purchase.
- Decide how much voltage control you actually need. Casual drivers rarely need adjustable cutoffs; anyone leaving the car dormant for long stretches benefits from them.
- Factor in cable length against your vehicle’s size. A five-metre cable is comfortable for most cars; larger vehicles or rear-camera runs may need extra length.
- Check whether fuse taps are included. Several premium kits sell the cable and fuse taps separately, which changes the real total cost.
- Consider single vs dual-output needs. Multi-camera systems benefit from a purpose-built dual kit rather than doubling up on single cables.
- Read recent review sentiment, not just star averages. Reliability complaints on some modules cluster around specific production runs, so checking dates on reviews matters.
Common Mistakes When Hardwiring a Dash Cam
The single most common error is wiring both fuse taps to switched-live circuits, which technically powers the camera while driving but leaves parking mode completely non-functional — the camera simply switches off the moment the ignition does. A close second is skipping the multimeter test and guessing which fuse is which from a diagram alone; fuse box layouts vary enough between trims and model years that manuals are sometimes wrong. Reviewers on installation forums also flag grounding to painted metal rather than bare metal as a frequent, hard-to-diagnose fault, since the camera may work intermittently rather than failing outright, making the fault maddening to trace. Finally, plenty of first-timers route cable too tightly around door hinges or pedal-box areas, creating a genuine safety hazard rather than just an untidy finish — always leave slack at any moving joint.
Mini Blade Fuse Taps and ACC Wire Connections Explained
The mini blade fuse is one of several standard automotive fuse sizes, and understanding it clarifies why fuse tap compatibility matters so much. Per Wikipedia’s overview of automotive fuses, blade-type fuses have used a common colour-coded sizing system since being introduced in the 1970s, with mini and micro variants now dominant in modern vehicles built to save space in increasingly crowded fuse boxes. A mini blade fuse tap simply slots in alongside your existing fuse of that size, borrowing a slice of that circuit’s power without cutting a single wire.
The ACC wire — short for “accessory” — is the half of your hardwire kit that only carries power when the ignition is switched to accessory or on position. It’s what tells the camera “the car is being driven, behave normally.” The second wire, usually labelled BATT or constant, stays live permanently, and it’s specifically what enables parking mode: without it, the camera has no power source to draw from once the ignition wire goes dead. Getting these two wires the right way round isn’t optional — swap them and you either lose parking mode entirely or leave the camera drawing constant power with no ignition-based reset at all.
Hardwire Kit vs Cigarette Lighter: Benefits vs Traditional Alternatives
| Factor | Hardwire Kit | Cigarette Lighter Socket |
|---|---|---|
| Parking mode support | Yes, with voltage protection | No — powers off with ignition |
| Cable tidiness | Hidden behind trim | Visible cable across dash |
| Socket availability | Frees up 12V socket for other devices | Occupies the only socket |
| Installation effort | Moderate — requires fuse box access | Minimal — plug and go |
| Best For | Nextbase Series 2 Hardwire Kit, VIOFO HK3-C | Anyone testing a camera short-term |
The comparison makes the trade-off obvious: a cigarette lighter setup wins purely on convenience for a five-minute install, but it sacrifices the one feature — parking mode — that most people buy a dash cam for in the first place. Hardwiring costs you an afternoon and a small parts bill, but it turns the camera into round-the-clock protection rather than a driving-hours-only recorder. For anyone still deciding whether the extra effort is worth it, the honest answer is that it depends entirely on whether parked-car incidents (scrapes, break-ins, hit-and-runs) are the scenario you’re actually trying to guard against.
Permanent Install & Parking Mode: What to Expect in Real-World Use
Once hardwired correctly, expect the camera to wake instantly the moment you touch the door handle or start the engine, with no manual switching required. Parking mode behaviour varies by kit: budget cables like the Plozoe Mini USB Hardwire Kit simply cut power at a fixed voltage, while the BlackVue Power Magic Pro lets you choose both a voltage floor and a maximum time limit, so the camera shuts itself off whichever threshold hits first. In everyday terms, a healthy battery paired with a sensibly configured hardwire kit should comfortably survive a normal working week of intermittent driving without any noticeable strain on cold-morning starts. What the spec sheet won’t tell you is that genuinely long dormancy — a fortnight away, say — is where even a good hardwire kit can leave a battery uncomfortably low, so anyone planning an extended trip should either disconnect parking mode beforehand or set the most conservative cutoff available.
Safety, Legal & MOT Compliance Guide for UK Drivers
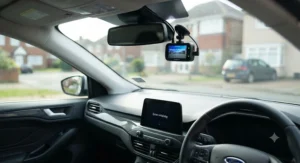
Dash cams themselves are entirely legal to fit and use across the UK, but placement matters more than most drivers realise. Per the official DVSA MOT inspection manual, a windscreen-mounted item is only grounds for MOT failure if it seriously restricts the driver’s view of the road — incidental intrusion into the wiper-swept area, provided visibility isn’t meaningfully affected, generally passes. Mounting behind the rear-view mirror, on the passenger side, remains the safest and most commonly recommended position precisely because it sits outside the driver’s direct sightline while still capturing a clear forward view.
On the electrical side, any hardwiring work should route cable away from pedal boxes, airbag modules, and steering column mechanisms — not just for tidiness, but because a snagged cable near moving parts is a genuine safety risk rather than a cosmetic one. Fuse taps should always match the manufacturer’s specified amperage rather than the highest-rated fuse available in a multi-pack, since over-fusing a thin accessory circuit removes the very protection the fuse exists to provide. If in doubt about your specific vehicle’s fuse layout or grounding points, a professional auto-electrician fitting takes an hour or two and removes any guesswork entirely.
Long-Term Cost & Maintenance (ROI)
A hardwire kit is a one-off purchase, typically somewhere between under-£10 for a basic fuse tap set and around £45 for a fully adjustable module, set against the ongoing cost of a car battery replacement should a poorly configured setup drain one flat repeatedly. Reviewers and installers alike frame this as cheap insurance: a single premature battery replacement, often £80–£150 depending on the vehicle, comfortably outweighs the entire cost of even the priciest kit on this list several times over. Maintenance itself is minimal once fitted correctly — an occasional check that the LED indicator (where fitted) still shows live power, and a glance at connections if you ever have dashboard trim removed for other work. The genuine long-term cost consideration isn’t the kit itself but getting the voltage cutoff setting right for your specific driving pattern, since an overly generous cutoff on a rarely-driven car is the real risk to battery health, not the hardwire kit’s basic function.
Frequently Asked Questions
❓ How long does it take to hardwire a dash cam?
❓ Will my dash cam still work if the car battery goes flat?
❓ Can I hardwire a dash cam without cutting any wires?
❓ Do I need a professional to hardwire my dash cam?
❓ Is it legal to hardwire a dash cam in the UK?
Conclusion
Hardwiring a dash cam isn’t the intimidating job it can look like from the outside — it’s two fuse taps, one earth point, and a bit of patience threading cable behind trim. Whether you land on the plug-and-play simplicity of the Nextbase Series 2 Hardwire Kit, the adjustable precision of the BlackVue Power Magic Pro, or the no-frills value of the Plozoe Mini USB Hardwire Kit, the outcome is the same: a camera that actually does its job around the clock, not just while you’re driving. Get the ACC and constant wires right, ground to bare metal, and give the setup a week to prove itself before trusting it fully. From there, your dash cam stops being a driving accessory and starts being what most people wanted all along — a permanent, silent witness parked right there with the car.
✨ Check current prices and availability before you buy, since stock and pricing shift regularly across UK retailers.
Recommended for You
- Hardwire Kit for Dash Cam 2026: 7 Best Options Ranked
- Best Dash Cam Motion Detection Parked 2026: Top 7 UK Picks
- Dash Cam With Parking Mode: 7 Best Picks for 2026
Disclaimer: This article contains affiliate links. As an Amazon Associate, I earn from qualifying purchases. If you purchase products through these links, we may earn a small commission at no additional cost to you.
✨ Found this helpful? Share it with your friends! 💬🤗
